Showing posts with label Tuesday Tutorial. Show all posts

Tuesday, December 13, 2011

Not Here Today! I'm Guest Blogging at Dear Creatives

Hey Everyone! I don't have a Tuesday Tutorial for you today on our blog, but I have one over at  Dear Creatives for you.
DearCreatives

You don't want to miss the tutorial, I'll be showing you how to turn an ordinary boxed set of Christmas Cards into something, well, "Semi-Homemade!"

And not only do I have a post there, but I also am sponsoring a giveaway for you to have a chance to win a set of eight Semi-Homemade Christmas Cards from yours truly! Giveaway Ends 12/18 @ 8pm PST.  

So be sure and stop over to get the tutorial and to enter for your chance to win a set for yourself.


Dear Creatives is also having a Holiday Hop where you can vote for your favorite Holiday Craft or Recipe. I've entered my Christmas Cone Advent Tutorial. Please take a second to go vote! Thanks!

And, don't forget about the giveaway going on here from Platterpuss Platters. It ends 12/15/11 @ Midnight EST.

I know this is a busy week for most. Be sure and take some time to enjoy the little things and the things most important to you. It's so easy to get caught up in the hustle and bustle of things and forget why we are so busy in the first place. I know I took, and am taking, some time to spend with my kids and husband. Don't let the Holiday Season pass you by without remembering the reason for the season and actually enjoying it with the ones you love!

Have a great day! Hope you enjoy the tutorial!

Monday, December 5, 2011

Tuesday Tutorial: Guest Blogger Hot Chocolate/Coffee Dipped Spoons


Hi, I'm Stacey and I'm so excited to be here for Tutorial Tuesday.  I blog at Boy, Oh Boy, Oh Boy! As the name suggests, I'm a momma of three boys. When I'm not cleaning up after, washing and folding laundry for, or wrangling my rowdy crew, you can find me in my craft corner. I dabble in many crafty areas and am always looking for something new to try.


From time to time you'll find:


 -things for the boys


 - some quilting


 - and home decor and holiday projects


Okay, on with the tutorial.  I don't know about you, but I wrack my brain each Christmas, trying to come up with small gifts for our neighbors and my son's teachers.  I think I've got something this year that will please them all.  I think these are the hardest gifts to give since generally we don't know them extremely well.


This year we're giving Chocolate Spoons.  These are great for coffee lovers as well as those who like a little spice to their hot chocolate.  Once gifted, the recipient simply grabs their favorite heated beverage, adds the spoon, stirs and awaits the flavored goodness.


Supplies:

- plastic or wooden spoons

- milk chocolate chips and white chocolate chips

- embellishments ( candy canes, sprinkles, toffee, coconut ect.)

- microwave, hammer, waxed paper

- clear or decorated plastic bags, baker's twine or ribbon


1.  Crush your "larger" embellishments using a hammer and place in a small bowl.


2.  Melt your chocolate chips and white chocolate in separate bowls, in the microwave.  I started with 1/2 cup of chocolate chips, on high, for 2 minutes.  Stay right by the microwave and check in every 30 seconds or so.  Pull the bowl out every so often to check for melted-ness.  Once the chips are melted they are ready.  This can be a tricky process because if they are in too long they are going to turn crunchy instead of smooth.


3.  Dip each spoon in the melted chocolate, making sure to cover the entire spoon.


4.  Sprinkle one embellishment on each spoon and set aside on waxed paper to cool/harden.  Another embellishment option:  drizzle a milk/dark chocolate spoon with white chocolate or vise versa.


5.  Once the chocolate has set, wrap the top of each spoon in a small, plastic bag and tie with twine or ribbon.


You can skip this step and just wrap the container, but I feel like the individual bags keep the spoons fresh until they're ready to be used.


Thanks for letting me join in the fun today at Bean Bug Crafts!


Pin It


Stacey
http://boyohboyohboycrafts.blogspot.com
http://www.facebook.com/pages/Boy-Oh-Boy-Oh-Boy/135619179823735?ref=ts

Monday, November 28, 2011

Tuesday Tutorial: Guest Blogger Scrappy Clock

Hey Maryanne here from Scrappy Gifts. I'm happy to be guest posting here at Bean Bug Crafts.
Here's a little bit about me.
My husband and I have been married for almost 7 years. We have an almost 3 year old boy (his birthday is tomorrow) and 7 month old baby girl. Along with my Scrappy Gifts, I have a blog called Crafty Mommy Diva where I try new crafts and projects, share mommy moments and fashionable Fridays.
Photobucket
Need creative crafty gifts for family, friends, or for yourself? Don't have the time to make a crafty gift or to scrapbook? Let me help you! I specialize in making scrapbooks: everyday scrapbooks, calendar, baby and wedding scrapbooks , guest books, scrapbook layouts, and creative gifts: scrappy canvas, clocks, and boxes. I can make any of these gifts: you choose the colors and what you want.
Photobucket
Need to find time to scrapbook more? Get motivated and join in on my Online Crops at my Blog Frog Community once a month to get some of your scrapbook projects done. Prizes, Games and Challenges. The next one goes from Thursday, December 1st at 2pm MST through Tuesday, December 6th at 11:59MST. This one in December is also going to be a combined scrap and craft/handmade night!
Love to scrapbook and need ideas? Share your ideas with others!  Check out my link party: Scrappy Saturdays.
BWS tips button

Now a Tutorial for you!
Still need a holiday gift idea? How about a Scrappy Clock - perfect way to bring more character to a room: family room, play room, baby's room. Here's the tutorial for you!
Supplies Needed:
  • Clock - mine is a generic one (from Sierra Pacific Crafts) at my local craft store. When I first made a clock, I used Heidi Swapp, but I didn't have the right size to make the circle on my circle cutter so it just became too complicated to trace and cut out the circle myself.
  • Circle Cutter - mine is from EK Success
  • Piece of glass (to cut your circle on so you don't mess up your table)
  • Scrapbooking Paper
  • Letter/Number Stickers
  • Craft Glue Dots
  • Scissors
  • Paper Cutter
  • Other small embellishments (nothing too bulky or your clock hands won't be able to go around)
  • Paper punch (optional) - I typically use a star or flower punch as a background for my numbers
1. Using your circle cutter, cut the right size circle to fit into your clock. For my clock, I'm using Track 2 on the smaller circle template.
2. Using your paper cutter, cut out a photo matte. I typically make mine 4.5x6.5
3. Decorate your clock face as you would a scrapbooking page, just use more flat embellishments. Most flowers work as well as stickers, rhinestones, some chipboard pieces, and ribbon. Adhere your photo matte and other embellishments that don't stick with craft glue dots (they're stronger and will hold well since this will be hanging). Make sure your photo matte doesn't have any adhesive in the middle or it will be harder to punch the paper through the clock.

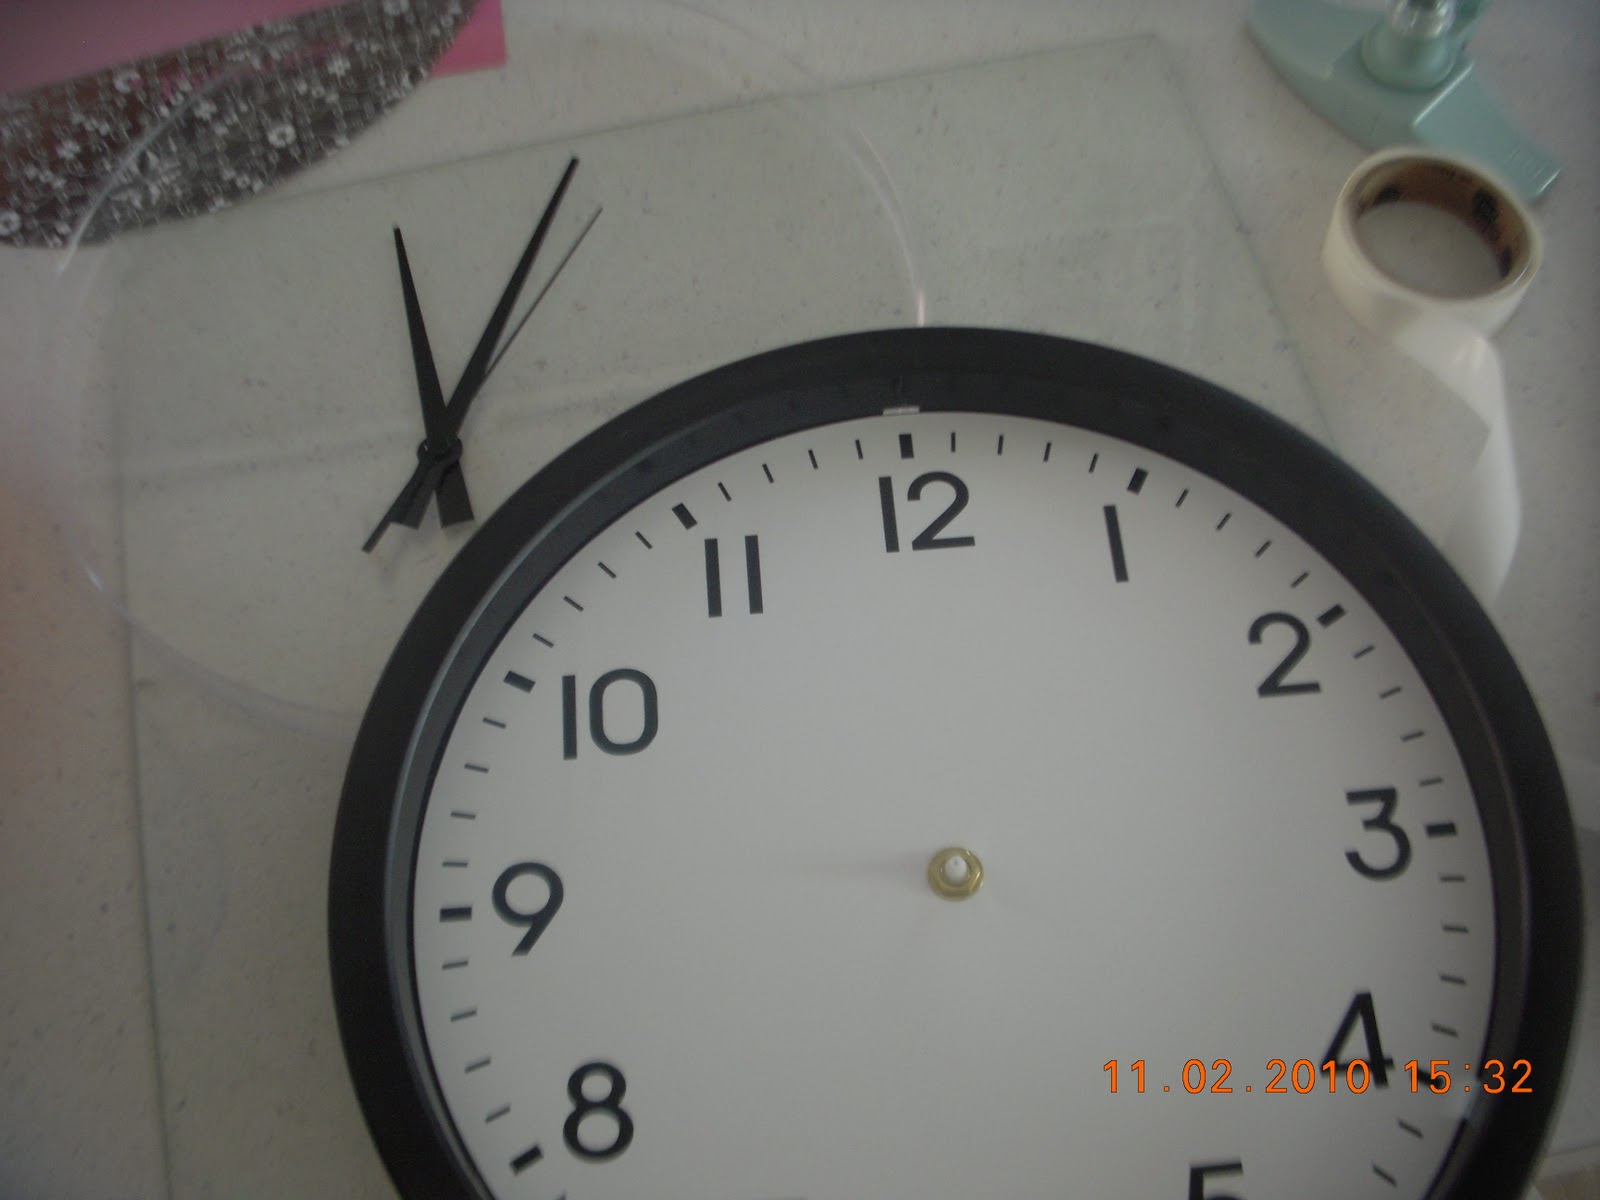
4. Remove plastic cover from your clock and the clock hands. Be careful not to bend your clock hands, otherwise you'll have trouble getting your clock hands to work just right again.
5. Place your clock face and press down in the center to push a hole through.

6. Then cut the hole to match the center of the clock. Then place clock hands back on, being careful again to not bend them. Then press the center down really well. If they're not in place correctly, the hands will fall our or won't make a correct rotation around your clock.
7. Using the numbers on your clock as a guide, place rhinestones or punched pieces to represent the numbers on your clock. I used rhinestones on this one: big ones to represents 12, 3, 6, 9 and little ones to represent the other numbers. Typically I use punched pieces and put number stickers on the top to represent my numbers on the clock. (see my other examples)

8. Put plastic cover back on and hang up your clock!

Other Scrappy Clocks I've made: Family One, Business One, and one that can hold 2 pictures.
Clocks I made inspired by customers' existing decor
If you still need some holiday gift ideas, consider trading/bartering with me or others for holiday gifts. Click here for more information! Have a very happy holiday season!

Tuesday, November 22, 2011

Tuesday Tutorial: Making Homemade Heating Pads

Today's guest blogger is Shari from Faithfilled Food For Moms. I met Shari through my BeanBugCrafts BlogFrog community. She is a Stay at Home Midlife Mom/Grandma. She has seven children, three are still at home, and three grandchildren! She uses her blog to share her experience, strength and hope with other moms and grandmothers. She is a follower of Jesus and offers devotions and daily scripture on her blog as well! Thank you Shari for helping guest blog today. I can't wait to make my Homemade Heating Pad!


Making Homemade Heating Pads
I realized the other day as I got into bed that my feet were so cold..and then I remembered..time to get out my homemade heating pad!  I use it ALL the time in the winter months.  But when I got it out I realized how shabby it was getting and..well.. a little dirty 


So it’s time to make another one.  As a matter of fact, since it’s almost Christmas,  I’m going to make several to give as gifts 
I’ll show you how easy it is to make these quality Heating Pads. 
Your browser may not support display of this image.
You can use any kind of Cotton based material you would like to make a Heating Pad.  I like to use a simple Place Mat.  It makes a nice size and it’s easy!   You can buy these at a dollar store or on sale any time of year.  Place Mats are made of heavy duty material and can withstand a lot of use. 


What you will need:
  • Any size Cotton Material
  • White rice/ not instant
  • Essential Oils, herbs, spices (Optional)
  • Sewing Machine
  • Funnel -Optional, but easier 
Your browser may not support display of this image.


If you are using essential oils, put only a few drops into a bowl of rice and stir.  Set aside.


Fold material in half and sew up the sides.  Sew a couple of seams down the middle to make a couple of chambers.  This is important, otherwise the rice all goes to one corner and is not evenly spaced out..like on down comforters.  That doesn’t feel so good when you want to lay on it. 


Now you are ready to fill with rice. 


After filling with rice, carefully sew the open end shut.  That’s it! 


Simply throw into microwave for 1 -2 minutes and you have a nice hot aromatic Heating Pad that lasts about 45 minutes.


You can also use these as ice packs.  Just toss into freezer and it’s ready to go anytime you need it.  (not good as an ice pack for food only for boo boos)


These make awesome gifts! 


One word of caution, many folks suggest making these for small children in different shapes and sizes.  While this sounds like a fun idea, children can be so easily burned with their sensitive skin.  I would not recommend using for small children.


You can also make covers for these to keep them nice and clean.


Monday, November 14, 2011

Tuesday Tutorial: Guest Blogger No-Sew Pin Cushion


Hello Everyone! I'm so excited to be guest posting here at BeanBug Crafts!


My name is Justine and I'm the girl behind Kerr-afty Creations!
I started blogging about a year and a half ago with the intention of sharing creativity and inspiring others (I also have a very crafty mom who lives a few hours away so this was a way to show her all my projects, haha).
In 'real life' I am a stay at home mom. I have a two year old and a five month old, both girls. So it is really nice to have some me-time in my craft room here and there. (then I can usually find a few minutes during Dora the Explorer to type up my posts!) I would love for you to stop by my blog and say hello. Now on to the tutorial:

Today I will be showing you how to make an easy No-sew Pin Cushion.


Supplies you will need:
- a frame (small or large...the one I used is approx. for a 2 inch by 3 inch picture)
- fabric
- polyester fluff
- scissors and gluegun


First take out the glass from the frame (in my case it was a cheap frame so I had to cut out plastic). Most frames come with a paper inside showing the size of picture to use, take this piece and cut out a piece of thin cardboard the same size and then cut your fabric slightly larger.


If you are using a circle/oval frame cut small slits along the outside of your fabric piece, with square/rectangle frames cut slits at the corners. Start to hot glue the fabric onto your cardboard piece gathering as you go, make sure not to pull tight leave the front slack.


Leave an opening at one end and stuff with the fluff.


Finish gluing around the cardboard.


Turn over and you should have a little pillow.


Hot glue around the inside of your frame
and quickly place the 'pillow' into the frame before the glue cools.


Replace the backing.
There you have it.... a quick, cute and handmade pin cushion!
Perfect stocking stuffer for those crafters on your list!


I happened to stuff my cushion too much so my backing didn't close all the way...but nobody really looks back there, right?

Thanks Anna for having me, it was so much fun to create a tutorial for your Tutorial Tuesday!!


Related Posts Plugin for WordPress, Blogger...